Software Defined Radio
This week at TinkerSoc, Dan talked about Software Defined Radio. Software designed radio (SDR) has been around a while, but doing it cheaply at home has only recently happened. SDR removes the requirement of expensive hardware and allows someone with an antenna and some receiver hardware to receive signals and use their computer to do the difficult decoding bit.

A RTL2832 chip was discovered to have a very wide frequency reception range. This can be found in many TV dongles. Dan’s is 64MHz to 1.7Ghz. The dongles are quite cheap (~£15) and he got his from eBay for £16. Matt and I picked a couple up fromAmazon. While these are currently out of stock, there are lots of options, most of the eBay auctions describe how the TV tuners can be used for SDR anyway. Some don’t though, so it’s a case of buyer beware, but there is a good list on what hardware can be used here. Essentially they need to contain the RTL2832 chip, this is the magic chip that the software defined radio can interface with.
Side note, for us students, TV licensing is a tricky thing, but as long as you don’t use the device to tune into TV you won’t have a problem
On the software side there are lots of options and things you can do. Some of these work on windows, some on linux/unix and some on mac. I’ve made a table of each of the software products, their compatibility and links to get them, again thanks to Dan for helping with this.
| Program | Description | Platforms |
| GQRX | GQRX is the graphical front end to GNU radio, it lets you see a waterfall, and a spectrum for the band you're currently looking at and tune your radio into peaks and so on. Its useful when starting out. | Mac, Linux and Windows |
| rtlfm | Lightweight FM receiver that comes with the rtl driver, can pipe its output to multimon for decoding, or sox to hear the output. | Mac, Linux and Windows |
| rtltest | Useful command line test program, its great on the Raspberry Pi for checking that the dongle isn't playing up. nb: Use a powered USB hub for running this on the Raspberry Pi. | Mac, Linux and Windows |
| rtladsb | Attempts to grab plane location data. You need to output this into something useful, on linux or mac you can use
rtlasbd | nc -lp 8001That streams this to a listening port of 8001 for another program to remotely connect to such as planeplotter (commercial), Dan is trying to find a free method with google maps. |
Mac, Linux and Windows |
| rtltcp | Used to remotely set up a server for a graphical program (gqrx) to connect to. This is great to use with something like the raspberry pi as the server. It has enough cpu power to run the server side (as well as decoding with rtlfm and multimon) and then you could connect to the remote pi using a laptop and stay warm inside. This lets you stick your antenna outside and high up whilst it streams information over WiFi to your computer. If using a Raspberry Pi, you will likely need a powered USB hub. Most will work, but if you aim to power the rpi from it as well you will need a good one that does not backfeed. Maplins did an expensive one, but worked (2A 4 port with ipad socket one) | Mac, Linux and Windows |
| Multimon | A digital decoder for things like APRS (a HAM navigation protocol) This is a command line program. | |
| ve3sqb | A site with free programs to design antennas, we went with a discone, because they are inherently wide band | Windows, but should run under Wine |
| wxtoimg | Comercial program, but there is a free version and it can decode NOAA satelite images (ie Weather satelites - no CIA shit) | Mac, Linux and Windows |
Once Dan had demonstrated the software using a small TV antenna, we used steel wire to create a discone antenna. We aimed at 110 Mhz, as 115 Mhz+ is where planes and other air traffic services tend to broadcast; lots of other cool things seem to talk on these frequencies too. Very little seems to sit around 100 Mhz and below that the military seems to start appearing. It’s likely encrypted and not something we want to be arrested for listening in to. The dimensions of a discone antenna start getting far too large at 100 Mhz and below too.
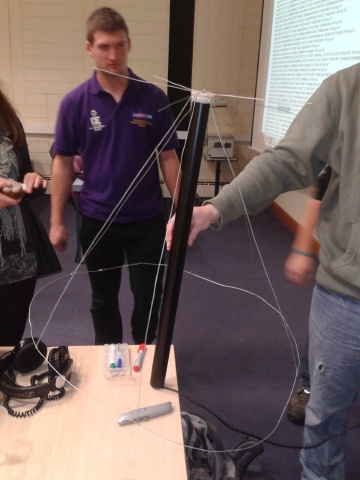
Using the discone program from ve3sqb we calculated the dimensions of the antenna for 110Mhz. We bought some galvanised garden wire from B&Q, 50 m for £4.50, this was way too much for what we needed (you may as well spend £2 for less wire if you try to do this yourself). From this, we cut 6 x 75 cm spokes, and placed them evenly around a large bottom ring of wire (who’s length we calculated using circumference = 2πr = πd). We made small hooks on the end of each spoke, to attach to the ring and soldered them in place. The bottom ring does nothing to the antenna except support it. At the top we made another ring, this time 5cm in diameter and attached the other end of each spoke to this in the same manner. This produces the cone part of the antenna.
The other part is 3 pieces of wire at 54 cm (rounding up from 53.8) in a star shape, this is soldered in the centre. This was strong enough to not need a support ring, so we soldered all this in place using the core of CAT5 cable (ethernet cable) wrapped around the overlapping parts.
Next we got a some 1.8 inch (4.5 cm) PVC tubing and cut it to around 80 cm. At the top we had a spacer thing, (from an ethernet cable spindle). It is just used to hold the cone and disc on the top of the PVC pipe, and allow use to leave a 0.5 cm gap between each part. We hot glued the pieces in place, making sure the spokes for each were aligned.
Finally, we used some coax cable, with the female termination removed. We threaded it up through the PVC pipe and soldered the signal lead (centre lead) to the top disc part of the antenna. The outer shield was connected to the top of the cone. We can now plug the discone into the TV dongle, and voila one discone antenna.
We found it worked quite well, even indoors and picked up some local radio, as well as an unknown distant station and some kind of signal broadcasting on our campus security frequency looks innocent. We didn’t have time to play much more with it, but Dan’s going to be fiddling some more so if we get some more cool results with it, we’ll post them here too!